Yucca/Spanish Dagger

Scientific name: Yucca spp.
Abundance: common
What: young flowers; flower stalks on both thick and thin-leaf yuccas before flowers appear; edible fruit of thick-leaf yucca (Yucca treculeana).
How: New flowers raw or cooked, flower stalks raw or cooked, fruit baked or roasted, stems raw or cooked
Where: Sunny areas
When: Flowers just after bloom, flower stalks before flowers appear, fruits when ripe, March through end of summer.
Nutritional Value: carbohydrates, minerals
Other uses: Soap from stem and root, fibers/cordage from leaves, laxative properties, fish poison (saponins) from root.
Dangers: Only flowers, flower stalk, and fruit are edible, the rest of the plant is very poisonous.

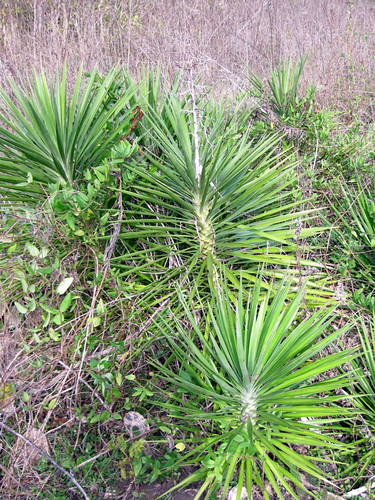
Yuccu plant
yucca2.jpg

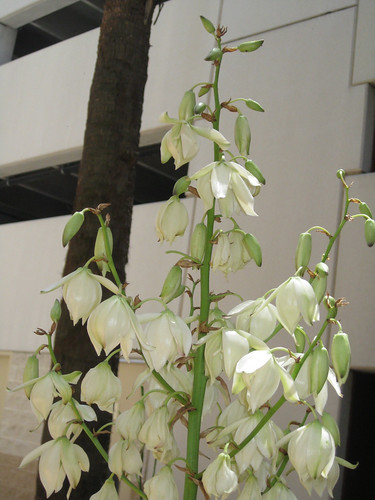
Yucca flowers. They are best within the first few days or opening but after that they can turn nasty. Taste one before harvesting a lot.
Yucca

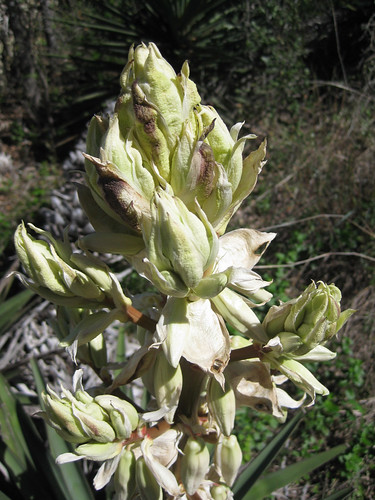
Closeup of yucca flowers and flower pods.
Yucca

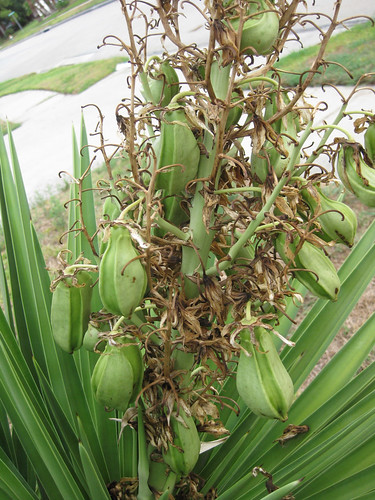
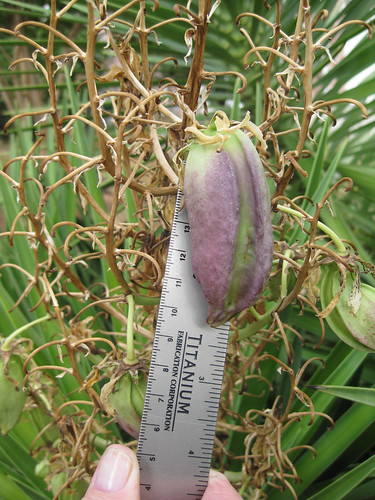
Yucca fruit.
YuccaFruit1

YuccaFruit2

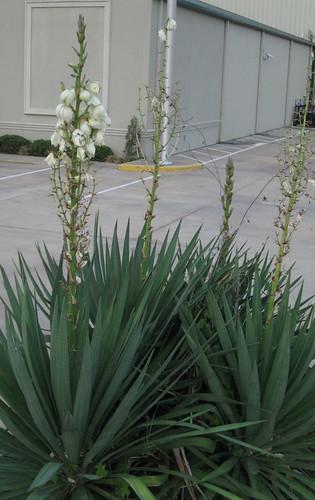
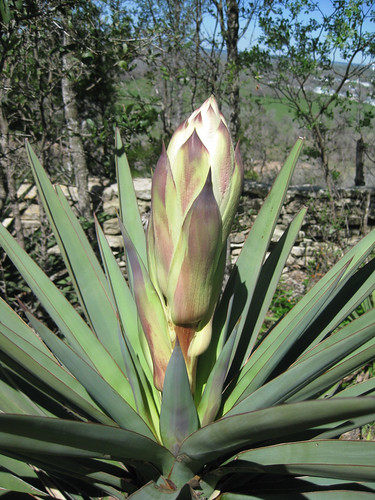
Yucca just before flowering.
YuccaFlowerStalk

Close-up of unopened flower stalk.
YuccaFlowerStalk2

Close-up of flowers just beginning to open. The individual flower buds taste like cauliflower.
YuccaYoungFlowers

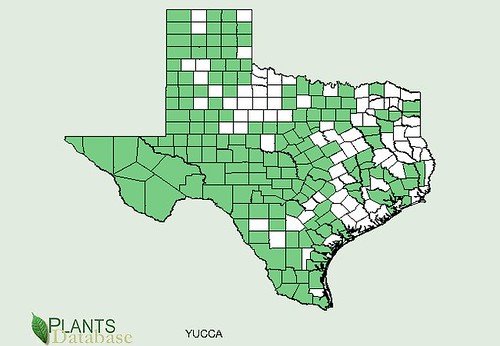
Texas distribution, attributed to U. S. Department of Agriculture. The marked counties are guidelines only. Plants may appear in other counties, especially if used in landscaping.
YuccaTX

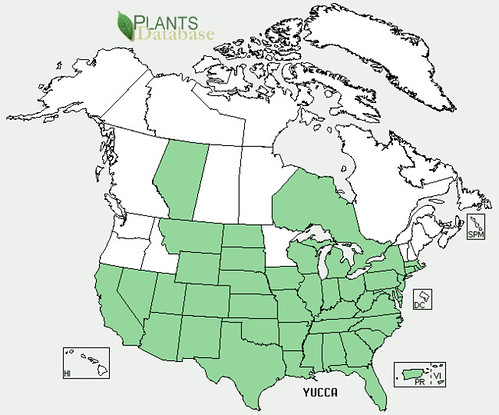
North American distribution, attributed to U. S. Department of Agriculture.
Yucca

The flower stalk is sweet-tasting before it produces flower pods/flowers. Roast or pickle it before the pods appear. As the flower pods mature the stalk becomes tasteless and tough. After the flowers have past the ripe fruit of the thick-leaf yucca (Yucca treculeana) can be roasted and eaten like eggplant. Thick-leaf yucca is identified by the leaf base being four inches across where it attaches to the yucca's trunk.

The fibers of the yucca leaf are very strong and have been twisted into cordage for thousands of years. It is best to soak the leaves in water for a week or more to rot (aka retting) away the non-fibrous portion of the leaf which would otherwise weaken the cordage.

Yucca root contains a very high concentration of chemicals called "saponins" which are a natural soap. Native Americans used to put mashed yucca root in a woven bag, which was then dropped into a small pond or stream which had been dammed. The saponins enter into the bloodstream of the fish through their gills, stupefying them. They float to the surface where than can be easily caught. If quickly placed in clean, un-poisoned water the fish may revive and not suffer permanent damage.


Buy my book! Outdoor Adventure Guides Foraging covers 70 of North America's tastiest and easy to find wild edibles shown with the same big pictures as here on the Foraging Texas website.

Medicinal Concoctions

Poultice – The simplest method of using many medicinal plants is to mash/pulp the plant by chewing then place it on the skin. Note, some plants can only be used externally and so can’t be chewed. Those must be pounded or chopped into pulp. The poultice can be placed “as is” directly on the skin though it is usually cleaner and easier to maintain proper placement if the mashed plant is wrapped in a single layer of thing fabric such as cheesecloth. Fresh plants usually contain enough water for a poultice though a bit of warm water often helps. Poultices made from dried plants will require rehydration with warm to comfortably hot water, bringing the mash to a cooked oatmeal like consistency. Poultices are generally made with leaves but also sometimes flowers and even roots.

Tisane – many call an infusion of plants steeped in hot water that is drunk an herbal tea, however the correct term is tisane. Standard ratio is 1 oz (weight) of plant in 1 qt of water steeped 30-60 minutes. Generally made from leaves and flowers.

Decoction – plant matter boiled 10-20 minutes, removed from heat, and steeped 1 hour. Decoctions that are drunk are also called tisanes. Standard ratio is 1 oz (weight) of plant in 1 qt of water. Generally made from roots, bark, and seeds.

Syrup – adding sugar to a strong (3.2oz plant per 8 oz of water) infusion or decoction as a preservative. Use equal amounts of sugar and water, simmer 20-30 minutes to dissolve all the sugar. Generally, honey, maple sugar, or raw sugar is used.

Lozenge - boiling a syrup down until it forms a hard candy upon healing. Usually requires syrup to reach a boiling temperature of 290 Fahrenheit on a candy thermometer.

Tincture – plant matter extracted in ethanol. Standard ratio for dried herbs to ethanol is 1:5 which is about 5oz of plant in a 1 qt jar filled to the neck with 100 proof vodka. Let sit minimum of 14 days, shaking twice a day but 6-8 weeks is preferred before straining out the plant. Fresh plant tinctures are made in a similar way but using the higher strength, 190 proof alcohol to take in account for the water present in the plant.

Double Extraction
– combining equal amounts of a tincture and a decoction. Usually done with Reishi mushrooms to extract the water and alcohol-soluble components. The same chopped mushrooms can be decocted by boiling for 10-20 minutes an equal volume of water to the amount of vodka tincture. A stronger double extraction is done using equal amounts of fresh mushroom for the tincture and the decoction.

Oil Infusion – plant matter steeped in hot oil (125°F to 145°F) 8-12 hours, allowed to cool, the strained. Use dried herbs as fresh ones can spoil in the oil resulting in a potential poisonous concoction. Standard ratio is 4 oz herb to 1 qt of oil.

Salve – an ointment made by combining an oil infusion with bees wax to thicken the oil. Use 1:8 ratio (volume) bees wax to oil for softer ointments and 1:6 ratio for harder salves.

Liniment – plant matter tincture for EXTERNAL USE ONLY made using rubbing alcohol (isopropanol) rather than ethanol. Use the same amounts of plant and rubbing alcohol as in tinctures.

Elixir - creating a tincture that uses equal amounts of plant material, alcohol (usually brandy) and honey. Let sit at least six weeks in a dark location, shaking every day, before straining out the plant matter and transferring to a dropper bottle.

Infused Vinegar - plant matter soaked in warmed vinegar (usually apple cider or a wine-based vinegar). Heat the vinegar to approximately 100-120°F, pour over plant matter in a glass jar. Cover plant material by ~1/2 inch of vinegar. Seal tightly and store in a dark place. Shake daily for at least two weeks before straining out the plant matter and begin using.

Oxymel - adding 1 part honey to 1 part infused vinegar.

Smoke - drawing the smoke from smoldering herbs into one's mouth is a potent way of accessing the medicinal compounds of some plants. Traditionally, this smoke was swallowed rather than drawn into the lungs, thereby avoiding lung damage.


Buy my book! Outdoor Adventure Guides Foraging covers 70 of North America's tastiest and easy to find wild edibles shown with the same big pictures as here on the Foraging Texas website.

Prairie Verbena

Scientific Name(s): Glandularia bipinnatifida
Abundance: common
What: roots, stems, leaves, flowers
How: tincture, tea (tisane)
Where: sunny fields, disturbed areas, landscaping
When: spring, summer, fall
Nutritional Value: unknown
Dangers: do not take if pregnant

Medicinal Summary: nervine (anti-anxiety), mild sedative, anti-inflammatory

Leaf Arrangement: The leaves are opposite-alternating, meaning pairs of leaves grow at the same level on opposite sides of the stem and the set above below will be rotated 90 degrees along the stem.

Leaf Shape: The leaves are deeply divided and bipinnatifid (leaf clefts have smaller clefts), measuring approximately 2-4 inches in length and 1-2 inches in width.

Leaf Venation: The leaves have pinnate venation, with a central midrib from which smaller veins branch out laterally.

Leaf Margin: The margins of the leaves are serrated with deep, irregular lobes.

Leaf Color: The leaves are green, typically a bright to medium green shade.

Flower Structure: The flowers are tubular and arranged in dense, rounded clusters called corymbs, located at the ends of stems. Individual flowers measure about 0.2-0.4 inches in diameter. Each of the five petals has a rounded notch at the outer end.

Flower Color: The flowers range from pink to purple, often with variations in hue within the same cluster.

Fruit: The fruit is a schizocarp (husked seed pod) that splits into four nutlets, each about 0.1 inches long.

Seed: Each nutlet contains a single seed, approximately 0.1 inches in length and 0.05 inches in width.

Stem: The square stems are erect and hairy, with a diameter of around 0.1-0.2 inches. They may become woody as the plant ages, especially near the base.

Hairs: The plant has glandular hairs that excrete a sticky substance, especially noticeable on stems and leaves.

Height: The plant typically reaches a height of 6-24 inches, depending on growing conditions.


Prairie Verbena Glandularia bipinnatifida

Prairie Verbena Glandularia bipinnatifida

Prairie Verbena Glandularia bipinnatifida

Prairie Verbena Glandularia bipinnatifida

Prairie Verbena Glandularia bipinnatifida

Texas distribution, attributed to U. S. Department of Agriculture. The marked counties are guidelines only. Plants may appear in other counties, especially if used in landscaping.


North American distribution, attributed to U. S. Department of Agriculture.


Prairie verbena aka Dakota Mock Verbena is (sadly) always a big hit in my foraging classes. Why is this depressing? Because often up to 80% of the students get really excited to learn it has anti-anxiety powers. Why the heck are so many people suffering from anxiety?! I don't get it, but at least nature is there to help.

To access its mentally soothing powers, pour 10oz of boiling water over one teaspoon of dried plant matter (flowers, leaves, & stems), then let steep 5-8 minutes. Strain out the verbena material, let cool to a drinkable temperature, then drink. The flavor can be adjusted with lemon and/or honey if desired.

Verbenas are not safe for pregnant women as they can stimulate uterine contractions.

These flowers are easily added to landscaping, bringing a long-lasting touch of color. They thrive in full sun all across Texas and surrounding states. While maybe not as strong of anti-anxiety agent as passion vine, it doesn't spread and take over your yard like Passafloria vines do.


Rose of Sharon

Scientific Name(s): Hibiscus syriacus
Abundance: common
What: flower buds, flowers, tender seed pods, seeds
How: flowers - raw; flower buds & young seed pods - raw or cooked like okra; seeds - roasted for coffee substitute
Where: landscaping - full sun, well drained soil, neutral pH
When: summer
Nutritional Value: antioxidants, mucilage
Dangers: none

Medicinal Summary: mucilage in flowers binds to glucose in the GI tract, slowing/stopping its passage into the blood

Leaf Arrangement: Leaves are arranged alternately along the stems, with each leaf emerging singly at a node.

Leaf Shape: Leaves are broadly ovate to rhombic-ovate, typically 1 1/2" to 3 3/4" long and 1" to 3 1/2" wide, often displaying three distinct lobes.

Leaf Venation: Venation is palmate, with three primary veins radiating from the base of the leaf blade.

Leaf Margin: Margins are coarsely crenate to serrate, featuring rounded to sharp teeth along the edges.

Leaf Color: Leaves are medium to dark green on the upper surface and lighter green beneath, with a slightly glossy appearance.

Flower Structure: Flowers are solitary and axillary, measuring 2 1/2" to 4" in diameter, with five broad, overlapping petals forming a funnel shape.​ 

Flower Color: Petals range from white to pink, lavender, blue, or purple, often with a contrasting dark red or maroon throat. 

Fruit: The fruit is an ovoid capsule, approximately 3/4" to 1" long, composed of five valves that split open at maturity to release seeds. 

Seed: Seeds are kidney-shaped, about 3/16" to 1/4" long, with a smooth surface and a fringe of reddish-orange hairs along the margin. 

Bark: Bark is light gray to gray-brown, smooth on young stems, becoming slightly rougher and fissured with age.

Hairs: Young stems and leaf petioles are sparsely to moderately covered with minute stellate hairs, which diminish as the plant matures.

Height: This deciduous shrub typically grows to a height of 8' to 13' and a spread of 6' to 10', forming an upright, vase-shaped habit.

Rose of Sharon flower color is somewhat temperature dependent, range from blue when cooler and white when hotter.
Rose of Sharon

Rose of Sharon

Rose of Sharon

Unopened flower buds are a tasty treat,
Rose of Sharon

Rose of Sharon leaves are toothed and also often have three lobes.
Rose of Sharon

Rose of Sharon

Rose of Sharon

Rows of brown, 2mm-diameter seeds are found in the dried seed pods.
Rose of Sharon


Texas distribution, attributed to U. S. Department of Agriculture. The marked counties are guidelines only. Plants may appear in other counties, especially if used in landscaping.


North American distribution, attributed to U. S. Department of Agriculture.


Rose of Sharon are a non-native member of the mallow (hibiscus) family originally from East Asia, but its striking blossoms have made it a landscaping favorite across the Southeastern United States. This large shrub can reach up to 14' in height, but winter frosted often kill branch tips, preventing them growing that tall.

The showy flowers are loaded with an assortment of antioxidants including carotenoids anthocyanins, and flavonols. These compounds give the flower petals their color and their concentrations are dependent on soil pH and nutrients, but the red anthocyanins are sensitive to temperature, breaking down during the hotter times of day, allowing the yellowish/orange carotenoids or blue/purple flavonols to show. This causes flowers to change color throughout the day or across the short, 2-3 day, individual blooming time. While the life of a single flower passes quickly, the bush constantly produces new flowers for several months.

Technically, the leaves of Rose of Sharon are edible, but I find them somewhat tough. But the flowers, from young buds, through opening, to tender seed pods, are wonderful. All of these stages are fine raw, but the closed flower buds and young seed pods can also be pickled or fried just like okra pods. If left to reach full maturity, the seeds collected from the dried pod can be roasted, then ground up and used to stretch out one's supply of coffee. They don't contain any caffeine, but they do have something like a coffee flavor...especially if you haven't had coffee in a while. 


Buy my book! Outdoor Adventure Guides Foraging covers 70 of North America's tastiest and easy to find wild edibles shown with the same big pictures as here on the Foraging Texas website.


How to learn edible wild plants.

Learning edible wild plants takes time and effort, there are very few shortcuts. However, the following tips will save you a lot of wasted effort. If you are serious about learning your local edible flora here what you want to do:

The Terrible Secret About Most Edible Plant Books
I get several e-mails a week asking "what one book is the best guide to edible wild plants?". The quick response is Peterson's Guide to Edible Wild Plants. It is probably the most comprehensive guide to edible plants in North America even though it mainly focuses on the northeast. It has color pictures, line drawings, and habitat info on hundreds of plants. But I have yet to meet anyone who successfully taught themselves more than 6-9 plants using this book. Few people can translate its line drawings and postage stamp-size pictures into real plants in the real world.

There's no such thing as a prefect, complete edible plant guide. Unless you are already a plant expert it's impossible to teach yourself all your local edible plant from a single book. It's too hard to have clear pictures of every plant in every stage of it's life. For that reason you really need to have multiple reference books. I have over thirty plant books that I use as guides. These aren't all just about wild edibles. They also include wildflower guides, weed guides, tree guides, botany textbooks, gardening books, forestry books, etc... Each book has different pictures and descriptions of the same plants. Once you get some books start flipping through them every chance you get. You want to train you eyes to see specific plants in all their stages among the Big Green Sea that surrounds you. You don't need to know the name or anything else about the plant at this point, just that you might have seen it in one of your books.

Update: when this article was first written I never expected I'd write a book. Well, I have and it avoids all the problems I described. Outdoor Adventure Guides - Foraging has multiple, big pictures of each plant (leaf, flower, stem, fruit, etc...) along with pictures of any poisonous mimics. It includes range maps to show you where in North America each plant is found, it even has a calendar showing you when the plant will appear depending on if you're in the south, central, or northern areas of this continent. Idiot's Guide: Foraging is available in both paperback and Kindle editions.

Cross Referencing
Once you've found a plant that might be edible it's time to ID it. Take a bunch of pictures of the plant's flowers, leaves (top and underside), stem, and overall appearance. Compare it to many pictures in your books, match the leaves, it's size and shape, and where it is usually found to similar plants in your books. At this point it's very helpful to understand plant descriptors (sepals, palmate, lobed, etc...) as it makes it easier to search through the books. Don't limit yourself to just using books to ID a plant. The internet is obviously another great resource for figuring out what the plant might be.

Take a Class
The best thing a plant newbie can do is take a class and I'm not just saying that because I teach the subject. A few hours with a good teacher will get you through the first, steepest part of the learning curves. By the end of the class you won't be adrift in the Big Green. You'll be able to pick out many plant all around you that are safe to eat (as well as know which tasty-looking plants are highly toxic!). Once you've been taught a bunch of edible plants, learning more becomes much easier as your "plant eye" will be much stronger. Then when you are on your own looking at a landscape you'll already see plants that you can/can not eat. You'll be left with just a few plants that you don't know, which is no longer overwhelming.

The other nice thing about taking a class is you'll get to see plants in different stages of their life. A particular plant may not be ready for harvest yet, but by seeing a young one you'll be able to go back and follow its growth. Or if it's past time you may be able to collect seeds to grow your own.

Growing Your Own
One of the best things you can do to learn edible wild plants is to grow your own. Seeds can be either collected in the wild (follow all appropriate laws!) or purchased via the internet. Observing the plant from seedling to maturity is a great way to train your eyes to see it out in the wild.

The Well-Trained Eye
The repeated scanning of your plant books, internet sites, and home-grown plants will have filled your subconscious with key plant-shapes to look for and you'll be surprised at how they suddenly jump out at you! Each time you go out pick a few new plants to research and after a year or three you'll have mastered the all local edibles. You know you are doing it right when you start dreaming about edible wild plants.


Buy my book! Outdoor Adventure Guides Foraging covers 70 of North America's tastiest and easy to find wild edibles shown with the same big pictures as here on the Foraging Texas website.

Making Sauerkraut and Other Fermented Foods.

Fermentation is one of the oldest forms of food preservation. While the word fermentation usually brings to mind the conversion of grains or fruit into beer and wine, it also covers microbial actions such as the conversion of starches and sugars into lactic acid. This lactic acid is what gives the tangy sour flavor to sauerkraut, kimchee, salami, sourdough, and yogurt. Vinegar is created by similar manner by bacteria which convert the alcohol into acetic acid. The lactic and acetic acids prevent other microbes from growing and spoiling the food.

These beneficial, acid-producing bacteria are found all around us naturally and under the right conditions they can easily be harvested. "Wild-type" bacteria don't always give great results so most people purchase bacteria which has already proven to be a good performer. The easiest way to buy them is in the form of yogurt with live culture. Strain the yogurt through cheesecloth and the resulting liquid is loaded with live lactic acid-producing bacteria. Lactic acid bacteria can also be bought in pill form in the vitamin section of most stores. Look for pills labeled Probiotic Acidophilus. To use, simply crush 1-2 of the pills and add the resultant power to your fermentation crock. These bacteria will reproduce and feed on some of the plant material to produce the lactic acid.

Probiotic Acidophilus containing 1 billion active cultures per tablet.
bacteria

Acetic acid producing bacteria can be found in certain unpasteurized vinegars such as Bragg's Apple Vinegar and some English malt vinegar. You can also purchase acetic acid bacteria "mother" from various places online.

The acid will attack most metal containers so ceramic, glass, or plastic vessels are used to hold the fermenting food. Traditionally large, straight-sided, wide-mouthed ceramic crocks were used and these still can be purchased from assorted online vendors. They are expensive though and usually outside the budget of most people just getting in to fermented foods. Luckily, circular ceramic crockpots and slow-cookers work just as well and are usually available from second-hand stores for under $10. Since the fermentation takes place at room temperature, the crockpot is left unplugged the whole time. The crockpots need to be circular in shape so a plate can be placed inside the crockpot to weigh down and completely submerge to food being fermented under the fermentation liquid. The acid-producing bacteria are "anaerobic" which means oxygen will prevent them from reproducing and must be excluded. Keeping the food submerged keeps the oxygen away, allowing the bacteria to do it's thing. Usually a weight is placed on the plate to keep everything submerged. I use a pitcher of water as the weight.

Sauerkraut: An Easy Fermented Food.
Sauerkraut (fermented cabbage) is one of the easiest fermented foods to make but it is also extremely nutritious. Sauerkraut is simply sliced cabbage with a little salt. More complex sauerkraut recipes call for additional things like apples, onions or spices such as dill and fennel. For your first time just stick with the basics.

Ingredients:
5 pounds of cabbage
3.5 tablespoons of sea salt (optional).
1-2 Probiotic Acidophus pills.

The salt isn't really necessary but adding it will help prevent "bad" bacteria from taking over while you are waiting for the acidophilus bacteria, which is unharmed by high salt concentrations, to grow. The acidophilus pills aren't need either as this sort of bacteria is already all around us and even on the cabbage leaves. I normally don't use these pills except when the weather is exceptionally cold resulting in slow-reproduction of the wild-type bacteria.

Step 1: Gather your stuff.
krautgear
Here we have the cabbage, crockpots, bowls, and sea salt. I use sea salt as it contains extra minerals that assist the bacteria in the fermentation process. Only one crockpot will be need to hold the cabbage.

Step 2: Slice the cabbage.
sliced
Peel off some of the outer cabbage leaves to get to the cleaner interior leaves. Also "core" the cabbage to remove the stem base. The stem base doesn't ferment well as it is large and solid which prevents the bacteria from getting into it. Some people puree the stem base and add it into the crock, but that just makes extra dishes. I'm lazy so I just feed the core to my worms.

Step 3: Salt the cabbage.
salted
Sprinkle some of the sea salt in the bottom of a large bowl, followed by some of the sliced cabbage. Continue to alternate layers of salt and cabbage. If you are adding crushed acidophilus pills do it at this same time, also in layers with the cabbage. Once the bowl is filled mix the salt and cabbage together with your hands while also crushing the cabbage to make it release its juices.

Step 4: Packing the cabbage in the crock.
bruising
Tightly pack the sliced cabbage into the crock. You want to press hard on it to drive out any air and also to squeeze more juice out. You need enough juice to completely cover all the cabbage. The salt will help draw out some of the water from the cabbage so don't worry if it at first is seems like there isn't enough juice. After a few hours a lot more juice will be freed from the cabbage so its rare that extra water needs to be added.

Step 5: Submerge the cabbage, part 1.
fermentingcovered
Place a plate on top of the cabbage to press it down under the water. I usually place a cup or an upside down bowl on top of the plate, followed by a cloth covering and then a pitcher filled with water on top of the cup or bowl. The pitcher increase the weight on the cabbge insuring it will stay submerged.

Step 5: Submerge the cabbage, part 2.
Fermenting1
Here you can see the cloth covering and the pitcher of water. The cloth keeps out any dust, spores, or flies that might want to contaminate the sauerkraut. The pitcher adds weight to keep stuff submerged. At this point depending on the room temperature it will take anywhere from four days to four weeks for the cabbage to reach the proper level of spicy, yummy fermentation. Check it every two to three days during this time to remove any "blooms". Blooms are simply white fuzzy/spiderwebby stuffy. It is non-toxic but kind of icky looking and can impart odd flavors to the fermented veggies if not removed.

A spider-webby bloom. Just remove it, the sauerkraut will be fine.
FermentBloom

Step 6: Eat!
LooksGood

Deciding when sauerkraut is "finished" is very subjective and only depends on your particular tastes. Visually it'll have a slightly translucent appearance but what really matters is the taste. If you like the way it tastes then it is finished. Pack the sauerkraut into covered glass or plastic jars and stick it in your fridge, making sure you included enough of the juice to keep the sauerkraut submerged. The batch shown being made for this article filled two quart jars.
The cold temperature of the fridge will cause bacteria growth/fermentation to slow almost to a standstill, no more lactic acid will be produced. The sauerkraut will then stay in this edible state for years.

In Mexico slices of carrots and peppers are treated this way. Kimchee is just Asian cabbages and other Asian vegetables mixed with spicy peppers and assorted seasonings and allowed to ferment into a fiery, tangy dish. Any plant can be fermented, whether it tastes good or not is up to you. I plan on making a kimchee-style dish using smartweed, dollarweed, spiderwort, chili pequins, and assorted other wild edibles. Hopefully it'll turn out fantastic...or at least edible.

Next up, a bunch of stuff mixed together.
fermenting
Update on the cauliflower/daikon radish/ginger/carrot/hot pepper mix: it's fantastic!!


Buy my book! Outdoor Adventure Guides Foraging covers 70 of North America's tastiest and easy to find wild edibles shown with the same big pictures as here on the Foraging Texas website.

Privacy & Amazon Paid Promotion Statement

I use third-party advertising companies to serve ads when you visit this website. These companies may use information (not including your name, address, email address, or telephone number) about your visits to this and other websites in order to provide advertisements about goods and services of interest to you. If you would like more information about this practice and to know your choices about not having this information used by these companies, click here.


I participate in the Amazon Services LLC Associates Program, an affiliate advertising program designed to provide a means for me to earn fees by linking to Amazon.com and affiliated sites. The prices you pay for the item isn't affected, my sales commission comes out of Amazon's pocket.

*These statements have not been evaluated by the Food and Drug Administration. This product is not intended to diagnose, treat, cure, or prevent any disease.