Common Herbal Teas


I. Introduction
II. Tea: Black, Oolong, and Green
III. Herbal Flavors
IV. Health Benefits
V. Techniques of Preparation
VI. Harvesting, Drying, and Storage
VII. Growing Herbs in Houston


I. Introduction
So, what's all this about teas and why are they so dang healthy? As usual, it's all about the chemistry. You basic “Lipton's” tea is loaded with a number of beneficial chemicals with the main class being known as "flavoniods". Most flavonoids work as antioxidants which is just a fancy way of saying they get rid of the bad, highly-reactive molecules (aka free radicals) in your body. These free radicals would normally bounce around ripping apart other necessary molecules, which is a very bad thing. Getting rid of the free radicals greatly reduces molecular damage to your cells, which is a very good thing.

If all you want to do is protect your molecules from destruction then regular tea is fine. However, why stop there? How about adding chemicals that can perk you up or make you relax, chemicals that can stimulate your immune system or settle down your stomach, chemicals that can reduces cramps or clear your sinuses of goo, maybe even extend your life? Yeah, they can do that and more. Let's learn more, shall we?


II. Tea: Black, Oolong, and Green

The most common teas (Black, Oolong, and Green) all come from the Camellia sinensis plant, originally from Asia. The difference between the three depends on how the leaves are treated after picking, mainly how much enzymatic breakdown they are allowed to undergo. This natural chemical process occurs as the leaves are dried and and once the proper level of breakdown has occur the leaves are heated to stop further breakdown.

Green tea is the least “broken” of the teas and so maintains the highest concentrations of beneficial chemicals but has the weakest flavor by most Western standards. Oolong tea is partially broken giving it a richer flavor and a slight reduction in the chemicals we seek. Black tea is allowed to break down the farthest. This results in the richest taste but a reduction of many helpful chemicals except for the antioxidants. But even Black tea been shown to reduce the clogging of arteries, inhibit cancer growth, and fight some viruses!


III. Herbal Flavors

Besides the assorted health and wellness chemicals available in herbal teas (sect. IV), they offer a whole world of tastes. Mixing and matching these flavors is one of the great joys of herbal tea.

SWEET
Anise
Licorice
Stevia leaves
Vanilla beans
Yaupon holly leaves
Blackberry/Dewberry leaves
Raspberry leaves
Apple fruit
Peach fruit Hawthorn
Strawberry leaves

FLORAL
Chamomile flowers & leaves
Elderberry flowers
Jasmine flowers
Lavender flowers
Basswood/Linden flowers
Clover (white and red)
Rose flowers
Chrysanthemum flowers

MINT
Spearmint
Peppermint 
Wintergreen 
Catnip 
Violet 
Basil 
Yerba Santa

SPICY 
Allspice
Cardamon
Cinnamon
Coriander
Fenugreek
Ginger

CITRUS*
Beebalm/Lemon balm
Lemongrass
Lemon peel
Orange peel
Lime peel Sorrel
*Warning: the peel of store-bought citrus fruit may have been treated with fungicides or other potentially toxic compounds. Wash them thoroughly before use or purchase organically grown fruits.

TART
Rose hips
Turk's cap flowers
Hibiscus flowers
Dock leaves

LICORICE
Anise
Fennel
Licorice
Star Anise
Goldenrod leaves & flowers

EARTHY/ROOTY
Dandelion root
Burdock root
Ginseng roots (flavor becomes bitter if left in water too long)
Chicory root

RESIN
Rosemary
Pine needles
Thyme
Sage
Cloves

BITTER
Chicory root
Ginseng roots (flavor becomes bitter if left in water too long)
Yarrow flowers & leaves
Willow twigs

ARBORACEOUS
Sarsaparilla roots
Birch leaves
Ginseng roots (flavor becomes bitter if left in water too long)
Sassafras roots
Burdock root
Echinacea flowers
Ephedra bark & twigs


IV. Health Benefits

Now it's time for the best part of herbal teas, the wonderful effects they can have on your body. Do you want to sleep or wake up? Are you suffering from a cold? Do you need your heart, or blood to function better? Do need to calm your stomach or your nerves? Yeah, there's a herb for that.

HERBS FOR ENERGY
Ginseng
Yaupon holly (caffeine)
Licorice
Tumeric
Chrysanthemum
Ephedra

HERBS FOR HEADACHES
Mint
Rose hips
Rosemary
Thyme
Lavender
Chrysanthemum

HERBS FOR IMPROVED HEALTH
Burdock root - blood purifier, antioxidants
Cinnamon - improves circulation, may increase longevity
Dandelion root - stimulates liver, flushes system
Lemongrass - cleanses blood, liver and kidneys; reduces blood pressure
Licorice - reduces congestion, improves focus
Stinging nettle - cleanses blood, stimulates liver & kidneys
Blackberry/Dewberry - high in vitamins, minerals, and antioxidants; blood cleanser
Rose hips - vitamin C, antioxidants
Rosemary - improves liver action and blood circulation, improves memory
Persimmon - vitamin C
Sassafras - blood cleanser
Hibiscus flower - antioxidants, control blood pressure, lowers cholesterol
Red clover - antioxidants, vitamins, minerals, reduces bad cholesterol, thins blood
Ginger - reduces morning sickness, reduces arthritis pain and other chronic pain
Jasmine - antioxidants, lowers bad cholesterol, may fight cancer, boosts immune system
Ginko Biloba – improves memory
Chrysanthemum – lowers blood pressure, high in minerals
Sage – blood purifier, improves liver, kidney, and brain functions,
Thyme – reduces anemia
Fennel – reduces pain
Ginseng – improves immune system, lowers bad cholesterol, improves blood flow
Hawthorn – strengthens heart tissue & blood vessels, lowers bad cholesterol
Mint – strengthens immune system

HERBS FOR CALM
Chamomile Oatstraw
Basil Valerian root
Lemon balm St. John's Wort
Lemongrass Ginseng
Mint Sage
Jasmine Licorice

HERBS FOR STOMACH ILLS
Burdock - reduces indigestion and constipation, increases bile production
Cardamom - increases digestion, reduces gas
Chamomile - reduces indigestion
Cinnamon - reduces indigestion
Cloves – aids digestion, reduces nausea
Fennel - improves appetite, stimulates digestion, reduces gas
Ginger - reduces nausea
Lemongrass - improves digestion
Mint - improves digestion, reduces nausea
Licorice – improves digestion
Blackberry/Dewberry - helps control diarrhea
Sage - improves digestion
Ginseng – increases appetite, helps digestion, cures diarrhea
Yarrow - increases appetite, improves digestion
Red clover - reduces gas
Stevia - reduces heartburn
Anise - reduces gas and indigestion
Thyme – reduces gas
Basil – reduces diarrhea
Fennel – reduces gas, aids digestion

HERBS FOR COLDS/FLU
Burdock - reduces congestion, opens airways, reduces fever
Elderberry - improves immune system
Fennel - soothes sore throats, reduces coughing
Ginger - soothes throat, opens sinuses, reduces fever
Lemongrass - reduces fevers and other cold symptoms
Licorice - soothes sore throats, reduces coughing
Stinging nettle - reduces coughing, opens sinuses
Black berry – soothes sore throat
Sage – reduces, fever, congestion and coughing
Strawberry leaves - slows diarrhea, reduces indigestion
Thyme - reduces coughing and sore throats, strengthens immune system
Yarrow - reduces congestion and other cold symptoms
Red clover - expectorant
Ephedra - reduces congestion
Anise - expectorant, reduces congestion
Cinnamon – reduces cold symptoms

HERBS FOR WOMEN
Cinnamon - reduces menstrual cramps
Ginger - reduces menstrual cramps
Lemongrass - reduces menstrual issues
Licorice - reduces menstrual cramps
Fennel – stimulates milk flow
Motherwort - reduces PMS
Blackberry/Dewberry - general menstrual aid
Skullcap - reduces PMS mood swings
Stevia - may help prevent osteoporosis
Fenugreek – increases lactation
Red clover - reduces symptoms of menopause due to estrogen mimicking molecules, not for use by pregnant women!

HERBS FOR MEN
Ginseng - improves blood flow to Mr. Happypants
Ginko Biloba - improves blood flow to Mr. Happypants
Ginger - improves blood flow to Mr. Happypants
Hawthorn - improves blood flow to Mr. Happypants
Blackberry/Dewberry - improves blood flow to Mr. Happypants


V. Techniques of Preparation
So now let's make the tea. There are a few things to keep in mind to optimize the release of power of your herbs. Being a chemist, I'm going to pull out the big words for this section.

INFUSION
This method is used for soft plant matter such as leaves, flowers, seeds, or crushed fruits/berries. Boiling water is poured over these materials which are then steeped for 10 to 30 minutes. The water is not brought back to a boil but rather it is allowed to slowly cool or heated to below boiling. The longer the herbs are soaked in this water the more flavor, nutrients, and medicinal compounds will be released. However, be careful with some bitter herbs as a long soaking of these can render the tea unfit to drink.

DECOCTION
To decoct means to add the woody herbs to boiling water which is then kept over heat and simmered 20-60 minutes. Roots, bark, and twigs need this more vigorous extraction. As before, the longer you soak the herbs the more you'll get out of them. If making a tea with both soft and woody components first boil the roots/bark/twigs then add the leaves/flowers/fruit and remove from heat.

TINCTURE
Extraction of herbal chemicals with alcohol makes a tincture. The basic rule of thumb is 300-400 grams of herbs are used per liter of alcohol. Let this mixture soak for at least two weeks with shaking every day. Some people leave the herbs in the alcohol others filter them out. Filtering them out makes for a cleaner tincture which I find easier to use. Vodka and rum (80-100 proof) are the alcohols of choice, with rum being better at disguising flavors of harsher herbs. To use, take one teaspoon of the tincture up to three times a day, either straight or added to juice or soda.
WARNING: never use wood alcohol, rubbing alcohol, or methanol to make tinctures.


VI. Harvesting, Drying, and Storage

Okay, so know you know something about the health benefits and flavors of herbal teas, now lets learn about proper collecting and storing of your future tea. It's a pretty easy, but there are a few things you should know to make great teas.

HARVESTING
Now days it is easy to buy tea herbs off the internet or even in grocery stores. However, the fresher the better in most cases and the freshest will be the ones you grow yourself. The best time to harvest your herbs' leaves and flowers is mid-morning after any dew has evaporated but before the day's heat has a chance to really set in. Most of the flavor-producing compounds are produced by chemical reactions in the plant during the night. But these yummy compounds are easily evaporated out of the plant by the sun's heat so the later in the day you wait to pick them the less there will be of these tasty and beneficial chemicals. However if you pick the leaves/flowers while they still have a coating of dew there is a very good chance that they will mildew and turn to a mushy, useless mess during storage.

The time of day is less important for heavier parts of the plant such as roots, twigs, and bark. The proper time to collect these are based more on the calender than on a clock. Late winter/early spring is usually the right time to collect twigs, roots and bark from trees as this is when they are starting to be flooded with life again after the cold, dark winter. This new life is the vitality you want to tap. On the other hand, the roots of flowers, shrubs, and non-tree-type plants are usually better in the fall. The plant has spent all summer turning sunlight into healthy nutrients and stuffing them into the roots for storage over the winter. Come spring these nutrients were to be used to regrow the plant but now you'll be harvesting that regrowth for yourself.

DRYING and STORAGE
A basic rule of thumb is the thicker the plant matter the thicker you can pile it on top of itself during drying. Leaves are best dried while still on the stems/stalks in bundles hung up in warm, dry areas out of direct sunlight. Remember, you don't want the good chemicals to evaporate away so warm with air circulation is better than hot or direct sunlight. If you have the room, store these bundles hanging somewhere dry. A layer of cheese cloth over them will keep the dust off them.

Flowers should be removed from their stems and gently shaken to get rid of any bugs (though these bugs are a source of protein). Place them on a cookie sheets one layer deep and set them in a dry, warm place. Again, avoid hot areas or direct sunlight. Air gently passing over them with prevent mildewing, molds, or fungi from growing which are BAD for tea. Once dry, place the flowers in lidded, wide-mouth jars. Traditionally porcelain or amber-colored glass jars are preferred to reduce degradation of the herbs by light.

Heavy materials such as roots, bark and twigs should be cut into strips approximately 4" long and no wider than your little finger, then loosely pile on a cookie sheet. As before, place them in a dry, warm area with moving air to dry them without losing any goodness. Twigs and uncut roots can be bundled and hung like your did earlier with the leaves. Bark and cut roots should be stored in the same manner as flowers.


VII. Growing Herbs in Houston
The most efficient way to grow herbs is in an “herb spiral”. This is simply a six foot wide by three foot high circular ramp of soil. Your herbs are planted along this ramp with their placement determined by their required growing conditions. Plants which need full sun are placed on the south-facing side of the spiral, full shade plants go on the north side. Partial sun/shade plants can go on the east or west sides. The top portion of the spiral dries quickly while the lower levels remain moist so plants that require well-drain soil are planted higher up and moisture-loving plants go in the lower levels. Table 1. lists common herbs and their growing conditions to assist you in planning your herb spiral. Figure 1. shows the basic layout of an herb spiral.

Table 1. Common herbs
Plant___Light___Water___Height____Width
Anise....full sun....well drained....18”-24”....12”
Basil....full sun....moist....18”-24”....12”
Beebalm....partial sun....moist....24”-48”....12”
Catnip....partial sun....well drained....12”-36”....12”
Chamomile....any....dry....9”....varies
Chrysanthemum**....full sun....dry....48”....24'-48”
Coriander....sunny*....medium ....12”-36”.... 8”
Echinacea....sunny....well drained....3'-4'
Fennel....full sun....well drained....48”....24”
Fenugreek....full sun....well drained....24”  
Ginger....partial sun....moist....24”....12”
Hibiscus....full sun....moist....7'....5'
Lavender....fun sun....well drained....36”....24”
Licorice....full sun....well drained....36”....24”
Peppermint....partial shade....moist....12”-24”....12”-24”
Roses....partial sun...drained....varies
Rosemary....full sun....well drained....72”....72”
Sage....full sun....well drained....24”-36”....24”-36”
Spearmint....partial shade....moist....12”-24”....12”-24”
Stevia....full sun*....well drained    24”....8”
Strawberry....full sun....well drained....12”....bed
Violet....partial sun....moist....6”....bed
Wintergreen....partial shade....moist....12”-24”....12”-24”
Yarrow....full sun....well drained....24”-36”....10”

Figure 1.  Herb spiral
Herbspiral
Remember, the spiral should be at or over three feet tall at the center. It is watered from the top, allowing the water to flow down around the spiral.


Buy my book! Outdoor Adventure Guides Foraging covers 70 of North America's tastiest and easy to find wild edibles shown with the same big pictures as here on the Foraging Texas website.

Collecting Tools

tools2.jpg
All one really needs to properly gather wild edible plants is sharp knife, a digging tool, and a container to hold your harvest. Personally, I prefer to use a garden shears instead of a knife when gathering leaves, shoots, tendrils, twigs, and other items that are cut off a plant. Note though that I always have a knife with me as part of the 10 Wilderness Essentials. For digging roots and tubers I use a Japanese Hori Hori Knife.

My harvest container depends on what I'm collecting. A net bags such as the type onions come in is very good for leaves/twigs/roots. Reusing a bag like this is also good for the environment. Berries and other delicate plant matter work best in shallow Tupperware-style containers. Don't use high-sided container for berries. You'll be tempted to fill the container to the top and the resulting weight will crush the berries at the bottom.

A bag with lots of pockets works great for carrying your tools, guidebooks, and harvest containers. I prefer a shoulder bag to a backpack because the shoulder bag has quicker access. You need to remove a backpack to take out/put in stuff. Shoulder bags do have an annoying tendency to swing forward into the way when you bend over, but I find clipping it to one of my rear belt loops with a cheap carabiner takes care of this problem.

Other optional gear:
1. Guidebook of edible plants (better safe than sorry)
2. Leather gloves (some plants have thorns)
3. Sunblock
4. Bug repellent
5. Long pants (better protection against bugs, sun, thorns, etc...)
6. Water (duh)
7. Small notebook
8. Ruler or small tape measure
9. Camera


Buy my book! Outdoor Adventure Guides Foraging covers 70 of North America's tastiest and easy to find wild edibles shown with the same big pictures as here on the Foraging Texas website.
Preparation Tips for Bitter Greens

Dandelions, chicory, thistles and wild lettuces are some of the most nutritional edible wild plants you can harvest but in their rawest forms they are very bitter and generally uneatable by any but the most die-hard foragers. Luckily, it is very simple to turn these plants into dishes that are not just eatable but actually delicious. It always helps to pick the leaves at the proper time (early young leaves before the flower stalk(s) have appeared) but these tricks will even help with late-harvested, extremely bitter leaves. These four different methods are as follows:
1. boiling
2. wilting with hot grease or oil
3. diluting with mild greens
4. overpowering the bitterness with salt, sour, and/or tart flavors

Boiling
Many of the bitter-tasting chemicals in these plants are soluble in hot water and so can be removed with 1-3 changes of boiling water. However this method also removes/destroys some of the nutrients so you'll need to increase the amount of greens you are cooking.

Cover the greens in excess water, boil for 10 minutes, then rinse of and taste a small bit of the plant. If it's still too bitter pour off this water and replace it with fresh water, then boil for another ten minutes. Keep doing this until the greens are edible. The resulting mass will be unattractive and lacking in the more water-soluble "good" chemicals, but the protein and other large phytochemicals will remain.

Wilting with hot grease or oil
This is my particular favorite method. Drizzling hot bacon grease or hot seasoned olive oil causes a chemical change to the bitter molecules and also leaves a protective coating on the tongue which reduces it's sensitivity to bitter flavors. Bacon/egg/sow thistle omelets are a Sunday morning treat at our house. The hot bacon grease converts the bitterness to a rich, deep flavor that I can't really describe other than to say I (and my young daughters!) find it to be fantastic. Vegans can use olive oil though for some reason I find the results to be inferior to bacon grease.

Don't completely cover the greens in the hot oil/grease, just dribble it on so most of the leaves have become a little "crinkly". I like to include a variety of bitter plants in the bowl to give a very complex mix of flavors. You will have to experiment a little to find the amount of wilting you prefer but luckily most of these plants are plentiful and it's easy to harvest plenty.

Diluting with mild greens
This is the best way for raw-foodists to incorporate dandelions and the such into their meals. It retains all the beneficial chemicals though it does require having assorted mild greens such as dayflower, young dollarweed, plantain, chickweed, amaranth, young hibiscus and turk's cap leaves, or even regular lettuce.

Finely chop or shred the bitter greens and combine them with the mild greens in a ratio of 1 part bitter-9 parts mild. This will greatly cut the bitterness to just the point of adding a unique flavor to your salad. As you grow accustom to the flavor you can increase the bitter portion, but few will go more than 3 parts bitter-7 parts mild.

Overpowering the bitterness with salt, sour, and/or tart flavors
The tongue, while amazingly sensitive to flavors, can be overwhelmed at times. Combining the bitter greens with soy sauce or a tangy red wine/vinegar dressing over-stimulates most people's taste-buds resulting in a reduced ability to taste the bitterness. This technique is another favorite of vegans and raw-foodists.

A similar effect occurs when incorporating the greens into homemade sauerkraut or kimchi. The sour fermentation of these foods will help break the bitterness though it requires more experimentation due to the unequal levels of bitter chemicals from plant to plant. In my opinion that is part of the fun of wild foods, though!


Buy my book! Outdoor Adventure Guides Foraging covers 70 of North America's tastiest and easy to find wild edibles shown with the same big pictures as here on the Foraging Texas website.
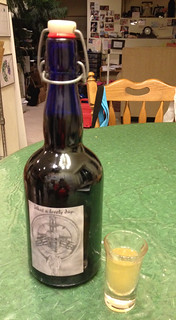
Merriwether's Immortality Elixir

Reishi Burdock Elderberry

A daily shot of a mixture of Reishi mushroom, Elderberry flower, Burdock root tinctures, Agarita wood, and honey keeps me healthy and knocks out anything trying to pull me down! This combines the anti-cancer, anti-viral, and anti-fungal powers of Reishi mushrooms, the immune system strengthener of elderberry, and the general adaptogen and blood/liver cleaner of burdock root. Berberine from agarita is added to maintain telomere lengths which reduces the physical aspects of aging. Honey is antimicrobial and a soothing agent.

Burdock Tinture:
1. Finely dice enough peeled, fresh burdock root to fill a quart jar 3/4 full.
2. Add enough 100 proof vodka to cover burdock root 1/2 inch deep.
3. Soak for six weeks, shaking twice daily.
4. Strain out solids, place in a tightly capped jar and store in a cool, dark place.
burdockroot

Elderberry Tincture:
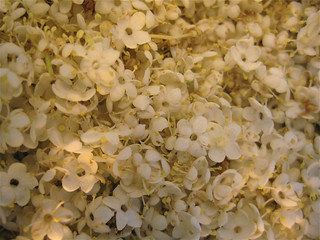
1. Fill a 1 quart canning jar 3/4 full with fresh elderberry flowers (no stems!).
2. Add 1 tablespoon of honey, two shots of Triple Sec orange liquor and fill most of remaining space in jar with 100 proof vodka.
3. Soak for six weeks, shaking twice daily.
4. Strain out solids, place in a tightly capped jar and store in a cool, dark place.
ElderberryFlowers

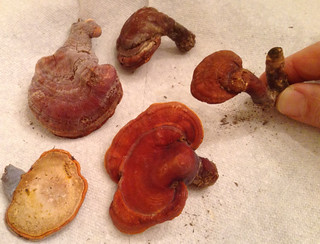
Reishi Tincture:
1. Finely dice fresh Reishi to 3/4 fill a PINT jar.
2. Add enough 100 proof vodka to cover Reishi 1/2 inch deep.
3. Soak for six weeks, shaking twice daily.
4. Stain out the Reishi mushroom pieces and boil them for 10 minutes in water equal to the volume of vodka you used in the second step.
5. Allow water to cool, then strain out Reishi, discarding the mushroom bits.
6. Add fresh water to replace any that evaporated during boiling.
7. Combine mushroom extract water with mushroom extract vodka. Some solids will appear. You want these along with the vodka/water.
8. Place in a tightly capped jar and store in a cool, dark place.
Reishi_2

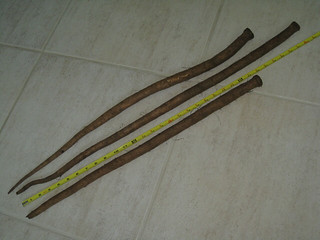
Agarita berberine to maintain telomere lengths, preventing aging.


Final Mixture:
1. Combine 2 pints Burdock tincture, 2 pints Elderberry Tincture, and 1/2 pint Reishi Mushroom tincture.
2. Stir 3 minutes with a peeled agarita stick to add berberine.
2. Add 1.5 pints of honey (making the final blend approximately 1/3 honey), it may take a few days to dissolve into elixir.
3. Shake well before using. One shot a day is what I take but keep in mind I'm a 6'5", 240 lb, 50 year old male who works out and lives a somewhat insane life. I can't tell you what sort of dosage you should take.


Buy my book! Outdoor Adventure Guides Foraging covers 70 of North America's tastiest and easy to find wild edibles shown with the same big pictures as here on the Foraging Texas website.
Tips on Making Wild Teas

Many wild (and landscaping!) plants can be used to make flavorful and medicinal teas. However, getting the best results requires knowing a few tricks based on plant physiology. To understand the tea one must understand the plant.

Let's start with flowers. Since the source of flavors from flowers reside on the flower's surface you can use blossoms either straight off the plant or in a dried form. Most flowers will have the best flavor right at opening which usually means mornings unless they're a night-bloomer. Pick flowers before the day's sun has baked away all their flavor. If they're to be dried make sure any morning dew or rain has evaporated away and then hang the flowers someplace to dry. Don't use a dehydrator as that'll force out much of the flower's delicate flavors...though your kitchen will probably smell great. To make flower tea, bring water to a boil, let it cool five minutes, pour it over the flowers, then let steep at least 5 minutes in a covered pot or mug (again to keep the flavors trapped in the tea).

Next up, leaves. Making tea from leaves requires aging the leaves first for best results. Remember, plant cells are enclosed in a rigid cell wall which among its duties is to prevent stuff inside the plant cell from getting out just as much as stopping stuff from outside the cell getting in. If you steep fresh leaves most of the flavors and medicinal components will remain trapped inside the leaves' cells rather than entering your tea. However, when a plant get's harvested or otherwise killed a set of enzymes inside the cell are activated and begin chewing holes in the cell wall. This is part of the mechanism used by plants to return their nutrients back to the soil when they die. After about two weeks the cell wall will have assorted holes so now when the leaves are soaked all their wonderful goodness will flow into the tea. To make tea from leaves, bring water to a boil then pour it over the dried and somewhat crumbled leaves, then let steep 3-10 minutes in a covered pot or mug. Strain out the leaves before drinking.

If you do want what's inside the leaves without the time needed to wait you must chop and grind the leaves up. This ruptures the cell walls, releasing the cellular compounds. The vitamin C found in pine needles or cleavers falls into this category. When one is suffering from scurvy one can't wait two weeks for the necessary vitamin C!

Fruit teas such as rose hip or Turk's cap fruit are similar to leaf teas in that dried fruits will give a better flavor than fresh fruits. Also, since the fruits are tougher than leaves go ahead and actually boil the fruits in the water for about five minutes then let everything cool down to a drinkable temperature. I eat the fruit afterwards but be sure to remove any rose seeds from the rose hips before drying as the fine hairs on rose seeds can cause irritation at the end of their journey through your digestive system.

Root and bark are usually the toughest parts of plants so they require vigorous boiling rather than just steeping in hot water. Boil roots/bark at least 10 minutes then remove from heat and let the tea steep and cool at least another 10 minutes before straining out the plant matter. As mentioned earlier, it's best if the plant has time to "age" a few weeks so that enzymes can break down the cell walls. If you need it right away you'll have to crush/grind the roots or bark.

Flowers for Tea:
Basswood, Barbados Cherry, Blackberry, Bottlebrush, Sweet Clover, Red Clover, White Clover, Dandelion, Dewberry, Elderberry, Goldenrod, Heal's All, Henbit, Horsemint/Lemon Beebalm, Mallow, Mullein, Parsley Hawthorn, Passionvine, Pineapple Weed, Rose, Milk Thistle, Turk's Cap, Violet, Wild Bergamot, Yarrow

Leaves for Tea:
Balloon Vine, Blackberry, Bottlebrush, Burdock, Carolina Bristle Mallow, Cleavers, Dandelion, Dewberry, Ginkgo, Goldenrod, Heal's All, Henbit, Yaupon Holly, American Holly, Horsemint/Lemon Beebalm, Lizard's Tail, Pine Needles, Loquat, Lyreleaf Sage, Mullein, Parsley Hawthorn, Passionvine, Pimpernel, Pineapple Weed, Sassafras, Stinging Nettle, Bull Thistle, Milk Thistle, Violet, Yarrow


Roots, Barks, Fruit, and Mushrooms for Tea:
Blackberry, Buffalo Gourd, Burdock, Chicory, Dandelion, Dewberry, Honey Locust seedpods, Horsetails, Indian Strawberry, Lizard's Tail, Mallow Seeds, Mayhaw, Reishi Mushroom, Turkey Tail Mushroom, Parsley Hawthorn Fruit, Rose Hips, Sassafras, Slippery Elm, Sumac Berries, Bull Thistle, Milk Thistle, Turk's Cap Fruit, Willow


Buy my book! Outdoor Adventure Guides Foraging covers 70 of North America's tastiest and easy to find wild edibles shown with the same big pictures as here on the Foraging Texas website.
Making Maple Syrup & Sugar

Maple sugar/syrup is easy to make and is a wonderful source of stable, storable calories. You can collect the sap from any maple tree (not just sugar maples) in any part of the world if you know what you are doing.

First, a little plant biochemistry. The sugar in maple sap is used by the tree as building blocks for making new leaves. This means the sugary sap starts flowing in late winter when the tree starts making the leaf buds. Up north, the tree "wakes up" and begins pumping sap up to its branches when nights are still below freezing but daytime highs are in the mid-40s. This is when you need to tap your tree. In southern climates knowing when the sap flows is trickier. I suggest you drill a 1/4" hole into your tree at a slight upwards angle 3" into the tree on New Year's Day and then watch for sap to begin leaking out. Drill this hole on the south (warmest) side of the tree about 3 feet off the ground, just as you would place a tap (aka "spile"). I wouldn't put a tube or anything in it other than maybe a cotton ball that had been treated with the bleach solution. Just keep an eye on the hole and see if it starts weeping.

Traditional maple tree taps are called spiles and can be ordered on-line from various sources. You can also make your own spiles from PVC tubing, Tygon tubing, plastic pen bodies, hollowed-out pieces of elderberry, bamboo, etc. Just make sure the hole you drill will hold the spile tightly. If the hole is too big you can pack the opening with softened wax. The spile should be cut at an angle with the longer part of the spile up against the top of the hole. Sap flows into the hole from the bottom (duh), so you don't want to plug the bottom of the hole. Sterilized soda bottles make great collectors as the small top keeps crap out of the sap. Traditional sap buckets have hinged cover to do the same thing (crap protection).

You need a maple tree at least 12" in diameter to tap. Drill the tap hole(s) on the south-facing side of the tree about three feet off the ground. If the tree is more than 20 inches in diameter you can add a second spile, and if it's greater than 27 inches you can have three spiles. The tap holes are drilled 3 inches deep at a slight upward angle. Spiles will be either 5/16 inches or 7/16 inches in diameter, so use the corresponding drill bit. Pound the spile into the hole and hang your bucket from the little notch on the spile.

IMPORTANT: Wash all your drill bits and spiles with a bleach solution before they enter the tree to avoid infecting the tree with fungus or bacteria! Use a 1:10 bleach to water solution (example: 1 teaspoon bleach in 9 teaspoons of water). Let any plug-dowel soak in freshly-made bleach solution for about 15 minutes before inserting it into the hole. Soak-time for spiles and drill bits ranges from 2-3 minutes for metal or plastic objects up to 15 minutes for porous materials. Some people spray this solution on the tree just before tapping but I have a bit more faith in the strength of trees than that.

Sap will run 4-6 weeks, but the sweetest, most sugar-filled sap will be at the beginning. Check your buckets and collect the sap every day at first as the sap will really be flowing and this will keep non-sap stuff out of the buckets. By the fifth week all the sugar that had been stored in the roots has been transferred up into the new leaf buds. Remove the spile, disinfect the tap hole, then place a bleach-treated wooden dowel in the hole.

It takes about 10 gallons of sap to make one quart of syrup, or a 40-to-1 sap/syrup ratio. Boiling it down releases a LOT of water vapor so it is best done outside. Side story: one year my dad decided to boil off the water using the stove inside the house. Mom was out of town that day. Dad boiled off approximately 50 gallons of sap which caused all the wallpaper in our house to peel. When mom got home she was pretty upset.

It's best to evaporate most of the water over a wood fire outside using a big pot. Pure water boils at 212F, finished syrup boils at 219F. Keep track of the temperature with a large candy thermometer. Once you've driven off enough water outside over the fire to raise the boiling temperature to 216F you can take it inside and finish it off over the more controlled heat of your stove. Transfer the fluid to a smaller pot, filtering it through some cheese cloth if there are solids present. Once it reaches 219F transfer the hot syrup to clean (sterilized by boiling) jars.

This syrup will stay good as-is for about two months and if frozen for up to a year. For longer-term storage it is best to reduce it down to maple sugar. To do this carefully keep boiling the syrup to drive away the rest of the water. You want the temperature of the boiling sugar to be between 290F and 300F. It will want to foam over and if it does remove the pan from the heat until the sugar/syrup settles down, then return it to the heat. Traditionally, the boiling sugar (290-300F) is transferred to a wooden bowl and stirred with a wood spoon to remove the last bit of moisture. It will harden into a solid mass as it cools. This mass is broken off the spoon and out of the bowl and stored in an airtight container. When sugar is needed use a heavy-duty cheese grater to grate off what you need.


Buy my book! Outdoor Adventure Guides Foraging covers 70 of North America's tastiest and easy to find wild edibles shown with the same big pictures as here on the Foraging Texas website.

Privacy & Amazon Paid Promotion Statement

I use third-party advertising companies to serve ads when you visit this website. These companies may use information (not including your name, address, email address, or telephone number) about your visits to this and other websites in order to provide advertisements about goods and services of interest to you. If you would like more information about this practice and to know your choices about not having this information used by these companies, click here.


I participate in the Amazon Services LLC Associates Program, an affiliate advertising program designed to provide a means for me to earn fees by linking to Amazon.com and affiliated sites. The prices you pay for the item isn't affected, my sales commission comes out of Amazon's pocket.

*These statements have not been evaluated by the Food and Drug Administration. This product is not intended to diagnose, treat, cure, or prevent any disease.